During some disaster recovery work, I deployed a Proxmox cluster to rapidly restore VMs from Veeam but ran into a restore target issue.
Veeam’s Proxmox plugin can back up VMs running on local-zfs just fine. Restoring them is the problem: Veeam won’t use a ZFS pool as a restore target. It needs Directory-type storage. ZFS storage types create zvols for each disk and restoring directly would obviously lead to complexities, especially when trying to export from Veeam as QCOWs.
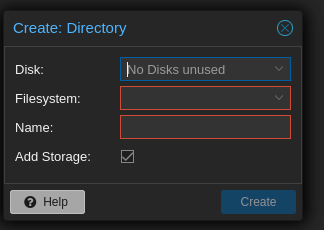
On Proxmox 9 you can’t just create Directory storage in the UI pointing at an arbitrary path. The wizard wants to format a block device. That’s fine if you have a spare disk lying around; not fine on a node that’s already running ZFS across the available drives.
The fix is to make a ZFS dataset and register it as Directory storage from the CLI.
Why this setup at all
This is a small cluster with a handful of nodes, spinning disks, no dedicated NVMe tier. Ceph isn’t realistic at this scale on this hardware and it would be slow and operationally heavy for what we’d get out of it. ZFS gives us decent local performance, compression, and most importantly Proxmox’s built-in replication between nodes](https://pve.proxmox.com/wiki/Storage_Replication) for some level of HA without a shared storage layer.
If your backups are already in Veeam, you don’t have much of a choice but to find the best way to perform restores to Proxmox.
The workaround
Create a dataset for restores:
zfs create rpool/veeam-restore
That mounts at /rpool/veeam-restore by default. Then register it with Proxmox as Directory storage:
pvesm add dir veeam-restore \ --path /rpool/veeam-restore \ --content images,backup \ --shared 0
--shared 0 because the dataset is local to this node. Run the same commands on every node you might restore onto — the storage IDs need to match if you want a restore to land cleanly on any node in the cluster.
Veeam writes the qcow2 disk files into the dataset as part of its restore. From there, build a VM shell in Proxmox and import the disk onto local-zfs:
Create the VM shell — match the original VM’s specs
| |
Import the qcow2 from the staging dataset into local-zfs
| |
Attach the imported disk/s and set boot order
qm set 100 \
  --scsi0 local-zfs:vm-100-disk-0 \
  --boot order=scsi0
You can also do this in the Proxmox web UI.
qm importdisk lands the disk on local-zfs as a proper zvol, but leaves it detached (it’ll show up as unused0 on the VM until you attach it). The qm set step wires it in as scsi0 and makes it bootable. Replication picks it up on the next cycle.
A few things to match against the original VM: VMID (if you want it to keep its old ID), CPU/memory, NIC model and bridge, and ostype. For Windows guests use --ostype win10 or whatever fits, and consider --scsihw virtio-scsi-pci plus the VirtIO drivers situation on the guest side.
Considerations
Since the directory is used to stage the backup, your total required free space(while keeping 20% free for performance) on your ZFS array needs to be at least double the VM’s size.